It didn’t take long after finishing my last project to get the itch to start another one. So far my stable consisted of a carbon fiber endurance bike, & two vintage Raleighs; one a single speed.
I spend a lot of time following bike profiles on Instagram & Facebook, while also browsing many bike forums of the internet. I started to realize while I loved the look of my vintage road bikes, I also was really starting to love the look of many modern urban & track bikes: wider frame tubes, straight forks, modern stems & wide riser bars.
I certainly wasn’t in the market for a brand new Cinelli – or any new bike/frame to be honest. So I started trolling craigslist, eBay, and FaceBook Marketplace to see what I could find. After about 4 or 5 weeks I came across a Cannondale frame in a nice color that looks like it could fit the bill – at least close to something I had in mind. After a little haggling I came home with it ready to strip it down, take stock of what was good to reuse & begin to plan out what I needed to rebuild it to suit my vision.

I was certainly excited to bring home my first Cannondale – especially a classic in such good shape. I did a little research after initially finding the listing & dug in more after getting it home. As is typical of sale listing on the internet it wasn’t a high end bike – just someone’s bike they bought X years ago, rode 10 times, and forgotten in a garage. After some Googling, and looking through PDFs of old Cannondale product catalogues I determined this was a R300 CAAD2 from 1999.
The R300 was the bottom-of-the-barrel road bike frame for Cannondale’s lineup at the time: aluminum frame & fork with a mixture of fairly decent drivetrain components, unremarkable bars & stem, & a decent wheelset. It should still be noted even their aluminum frames back then were second-to-none when it came to keeping weight down. The R500, R600, R800 & up models were outfitted with a lighter, higher quality aluminum frame, carbon forks, & high end shifters & derailleurs. But for my purposes, this would be fine for a project bike.
Click the thumbnails below to view larger images (this applies to all the galleries in this post) of the bike as it was when I got it home:

Closeup of the model – with the former owner’s cyclometer wiring wrapped everywhere. 
Cannondale’s CODA bars & stem. 
Shimano Sora STI shifters (not bad for the time period) 
Shimano RSX triple crank & derailleur. 
Shimano RSX rear derailleur. 
Shimano RSX brakes 
Mavic wheels (nice!) 
Shimano crank details 
Derailleur
Like I said, the R300 came with a decent caliber of components for the time period. The Shimano RSX groupset is well regarded in the bike community for it’s solid feel, reliability, & relative light weight. Everything was in good working order – if not a little grimy. Time to strip it down.
My previous project bike was from 1974, and I was timid about working on certain parts so I let the bike shop handle those few things. But this time I decided I wanted to do it all myself. I knew I wasn’t going to replace everything but what did need to be fixed were some of the more important and less approachable components for the DIY layman: the headset & the bottom bracket. The upside – besides gaining the experience – was that I got to buy more tools! I did a bunch of research online and poured over the 1999 Cannondale catalog for the bike specs. It took a while but eventually I took the dive, ordered the parts, and figured what the hell.
Original components to keep – just needed some cleaning:
– Wheels / hubs
– 8 speed cassette
– Front & rear derailleur
– Seatpost (for now)
– Front & rear brake calipers (but new pads, obviously)
Components I replaced:
– Headset
– 1″ threaded stem
– Handlebars
– Brake levers
– Shift levers
– Bottom bracket
– Crank & arms
– Saddle
– Pedals
– Cables & housing (duh)
– Tires
Taking off the bars, levers, cabling, and wheels isn’t anything special. But removing the headset, crankset, & the bottom bracket required some new tools. I needed a tool to remove the headset cups which are pressed into the frame, a crank puller to force the crankset off the spindles, and a tool to remove the bottom bracket itself from the frame. All-in-all it was quite easy. Some pics below, click one to open the gallery. (I wasn’t able to grab any of pulling the crank or unscrewing the bottom bracket since they required both hands at all times.)

Removing the front fork 
New weirdo tool for popping out headset cups 
Top cup out 
bottom cup out 
Old BB removed
Here are the tools I used in case you’re thinking of giving it a go:
Headset remover: CyclingDeal Headset Cup Remover
Crank puller: Park Tool CCP-22
Bottom Bracket Remover: Park Tool BBT-22 -–NOTE: different BBs require different tools – it’s not universal. Make sure you get the right one.
The R300 still used a 1″ threaded headset instead of a more modern threadless one. There are plenty of simple, no-flash threaded headsets out there to be had for about $10. But I wanted to put something a little better in, so I opted for a FSA Duron X 1″ threaded headset. It was about $50 but it’s a sealed bearing design, has a nice look to it, feels superb, & is quality built.
The bike having a classic threaded headset meant that most of the time it would be paired with a traditional quill-style stem and bar clamp. But as I mentioned I wanted to give it the more modern look so I picked up a threaded-to-threadless stem adapter from Profile Design. This let’s you attach a modern 1 1/8″ threadless 31.8mm front-loading bar stem and opens up a lot more option for handlebar choice as well.
To finish the cockpit off I picked up a Ritchey Classic C220 stem in an 80mm reach (I’m short), and my favorite new piece; Nitto For Shred handlebars with a very wide 650mm wingspan (they actually come 750mm standard).

I borrowed my buddy’s headset bearing cup press to install the new headset, which I had to do before anything else could happen. It was surprisingly simple, but can be understandably more difficult without a cup press – and this particular one costs almost $200. There is a cheaper one, but it’s not as fully featured. I’ll admit I watched a few videos on YouTube and read the Park Tool page about 4 times before giving it a go but in the end it was so damn easy.

Naked headtube 
Pressing in the bearing cups 
Fork inserted & locknut screwed on
Once the fork was in and the locknut was on, I could start fitting the adapter & the stem. There’s nothing special about adding these pieces, but I did run into a small issue. The length the fork was cut made fitting the right amount of spacers to fill the gaps a bit tricky. You’ll notice in the 3rd pic above there is a small amount of available threads at the top of the fork.

Adapter in!
Stem & bars added 
Spacer issues
So you’ll notice in the 3rd picture above there is a small empty space beneath the Ritchey stem. I tried adding another metal/silver spacer under the headset’s locknut to close the gap but this left too few threads for the locknut to tighten upon. So, I was going to have to add spacers to the adapter. My buddy gave me some extras he had and thankfully one of them fit the space perfectly. I tried it under the stem but it interrupted the aesthetic flow from the locknut to the stem. Remember, usually a narrow quill stem would protrude from the headset so aesthetics wouldn’t be an issue, but I’ve added a wider stem & adapter. In the end I had to add the spacer above the stem, right under the top cap of the adapter. Apparently I didn’t take a pic of that so you’ll just have to look at the final build pics.
Brake levers, the shifter, and grips were next.

Topographic grips, baby! 
With the lever & shifter 
Front view
There’s no shortage of badass grips out there for the flat bar single-speed & fixie crowd. I ended up falling in love with RaceFace’s Half Nelson grips. They come in a lot of colors, and are covered in a sweet topographic design! Between my wife being a geologist & myself a science teacher I basically couldn’t not get them. They’re not the the cushiest, but the material offers an excellent grip.
I wavered endlessly on brake levers. I wanted something that was low profile but also fit the look of the bike. Paul components are far out of my price range so it came down to Tektro’s FL-750’s, Dia Compe SS6′s, and some Shimano 105 BL-R550’s which I ultimately went with (obviously).
Lastly, the RSX cassette required an 8-speed shifter. I didn’t want to use a friction shifter, or an indexed thumbie; I wanted a trigger shifter for quick, easy shifting. I had to go to Amazon to find this part since 8-speeds aren’t typical anymore so finding NOS is really you’re only choice. I went with a Shimano Altus SL-M310 rapidfire shifter. Check it in the 2 pics above.
Ok – time for mounting the sexiest piece of hardware; the Sugino RD2 crankset I ordered from Retrogression. It’s got a 48 tooth chainring with a 130mm bolt spacing configuration, and since I’m short I got it with 165mm crank arm length.
First comes the new bottom bracket – which was a simple Shimano UN55 square taper with a 110mm spindle length. Mounting is pretty straight forward – screw in the two pieces, then mount the crank & arm to the spindle.

An empty (BB) shell 
Tools of the trade 
New BB in! 
DAMN THAT LOOK GOOD
The 8-speed cassette & the crank take a 3/32″ chain, FYI.
Nothing special about the pedals – just a set that are relatively light, look good, and can mount toe cages & straps. I threw on another set of Origin8 Pro Track Lite pedals – the same ones I have on my every day commuter bike.


That’s pretty much it. The wheels, cassette, and rear derailleur were thoroughly cleaned up to look basically new. My buddy trued the wheels for me. I ordered a set of Kenda Kwik Trax tires in 700×28, and a Specialized Milano saddle and was basically done!
Oh, one tiny little thing – I ordered a set of Problem Solvers downtube shifter boss caps to replace the cable guide on the left side of the downtube. It would usually be used for the front derailleur, but the bike was now a 1x, and I couldn’t leave the original piece there it looked awful. You can see this cap in the final picture gallery below.
So I assume you’d like to see the whole finished product finally, eh? Well if you’ve ready my drivel for this long you’re certainly ready!
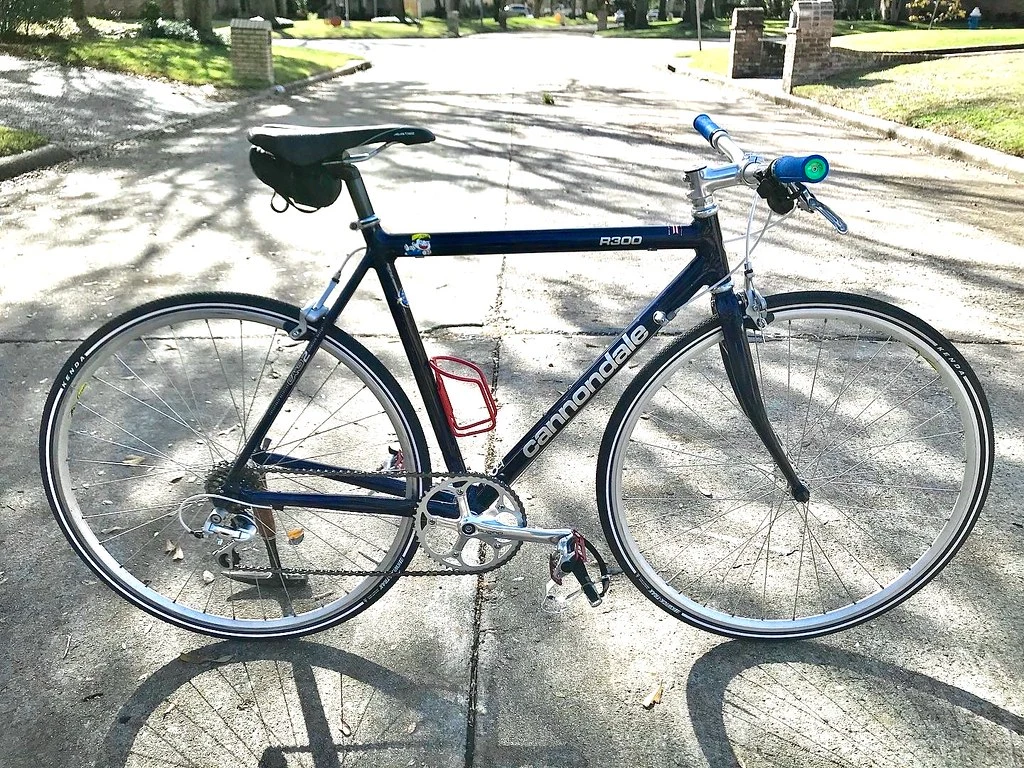

Rear view 
Where the hands go 
Mix of classic & modern 
Crank 
Drivetrain 
Downtube shifter cap 
Front view
Full spec list:
Frame: R300 CAAD2 Aluminum
Headset: FSA Duron X1 1″ threaded
Stem: Ritchey C220 1 1/8″, 80mm
Adapter: Profile Design 1″ to 1 1/8″ threaded-to-threadless
Handlebars: Nitto For Shred, 31.8, 650mm
Grips: RaceFace Half Nelson, blue
Levers: Shimano 105 BL-R550
Shifter: Shimano Altus SL-M310 8 speed rapidfire trigger
Bottom Bracket: Shimano UN55 square tape, 110mm spindle, 68mm shell
Crank: Sugino RD2, 48t, 165mm
Pedals: Origin8 Pro Track Lite
Wheels: Mavic CXP11
Hubs: Shimano RSX
Tires: Kenda Kwik Trax, 700×28
Rear Derailleur: Shimano RSX 8SIS long
Cassette: Shimano RSX 8 speed
Seatpost: Stock, 27.2
***To see all the photos above & more not included here please visit the photo album on Flickr.
Thanks for reading; I hope you enjoyed the process as much as I did. Already looking forward to my next project.
Get out there and ride!

Looks rad as hell! Thanks for all the in depth information on components, and links!
Thanks Pete, it was fun to rip some pavement on for commutes.
If you’re interested, I actually just made some changes so I could sell it, so I made an update post here: https://thesurlybiker.wordpress.com/2020/05/20/update-made-some-changes-to-1999-cannondale-r300/
Hey, did you consider buying a new fork? I have this exact bike, I am thinking about replacing organic fork with a carbon fork. Thoughts?
Original fork I meant!